
Creating Book Art
| | By Moini | Category: Paper | 54 Comments | Gallery (60 images)
What’s book art?
")
In various places, you can see those beautiful folded book art pieces (like in these instructables: Book-Art-How-to-Fold-a-Book-into-a-Word, Folded-Book-Art-Best-most-clear-Tutorial-available ) - and it seems you’d like to make your own one, with your own pattern, now!
This page will guide you how to accomplish this in an easy, step-by-step way.
Preparations
Choose a picture
Best practice: Keep it simple!
The simpler the image, the fewer pages are necessary to make a good picture and the easier it will be to recognize which object you folded into your book pages.
You need a picture which fulfills the following requirements:
")
- A picture of a dark object in front of a bright background - preferably, a black object in front of a white or transparent background.
- The picture must be saved as a png or jpg image file
- In the picture, there may not be any vertical gaps. This means, that, if you drew vertical lines through all of your picture from top to bottom, there would not be any line which does not cross through a dark part of your picture. The only white vertical space is allowed to the left and right of your object.
- There may be only few ‘holes’ in your object, especially if the holes stack vertically. I suggest having no more than 3 vertical holes directly above one another.
- The object should not be very detailed. The simpler the shape, the better the result. Silhouettes or single letters work great.
- The object should not be too wide - the fewer pages in the book, the thinner your object should be.
- You must really want to fold THAT object, because… it’ll take a while. Even if my script spares you the work of preparing and measuring the picture, you will still have to measure pages and fold pages…. for hours on end.
Choose a book
")
A suitable book should fulfill the following requirements:
- You need a hardback book (a paperback will topple over!)
- One you don’t intend to read (again).
- And one with many pages.
How many pages exactly you will need depends on your picture - a wide picture needs more pages than a thin one and a detailed picture needs more pages than a very simple one. When you think of pages in terms of resolution of the picture, remember that only every second page number of the book is in fact one sheet of paper - and corresponds to one ‘pixel’ (or better: slice) in the width of your art work.
So if you think ‘Wow, this book has more than 200 pages’ - it is really only about 100. And think of pictures which are 100 by 100 pixels - they are SMALL. So take a book with many, many pages.
Hint (optional, but useful):
If you want to know the optimal width to height ratio for your picture, put your book upright and fan out its pages. When they have a ‘good’ distance from each other, so that you can imagine your picture being rendered well, you can measure the width to height ratio of your book. If you adjust the dimensions of your picture to this (by adding and removing empty space, not by distorting the image), you can optimize your result.
Create the pattern and preview
Now that you’ve got everything prepared, head over to the Bookart page and enter the values of your art project into the form. Tooltips will help you choose the right options for your project.
If something is wrong with the settings you chose or with the image you used, you will get a feedback message telling you what you need to change.
After you clicked on “Create template!”, your pattern preview and pattern text will be available for checking and download.
Note:
When you make a pattern using this web site, your image data or settings will not be transmitted via the internet, as all processing will be done within your web browser. Nobody but you will be able to see what kind of picture you want to put on your book.
Check the preview
")
Take a look at the pattern preview. If you downloaded it, you might have to zoom in (Ctrl + Scrollwheel in most browsers) to see all the vertical lines, else you’ll probably have to scroll to see everything.
Don’t worry about the aspect ratio, only check if the object is there, if the pages alternate well and if the level of detail is what you want.
If something looks wrong, check that your picture fulfills all requirements mentioned above.
If the alternation of the pages looks wrong, try starting at another even page of your book (for example, if the first even page number is 4, try 6 next time). You can also add or remove whitespace around your object to allow it to be better centered.
Tweak the settings and create patterns until you are happy with the preview.
Fold the book
How to read the pattern
")
- The first column tells you which page to fold.
- The second column tells you where to fold the top of the page down, measured from the top.
- The third column tells you where to fold the bottom of the page up, measured from the top.
Print the pattern out - or leave the file open to save paper and listen to music from your computer while folding.
Put on some good music, or audio book… and FOLD
Now it’s the time to MARK and FOLD. This may take some time - and it’s a bit meditative. If you don’t like to meditate, put on some good music or an audio book :-)
I found that I preferred marking and folding in one step. You might be more efficient if you mark all pages first and fold in a second step. The marking and folding in one step has the advantage that you notice errors (like jumping a page number or measuring wrongly) right away. Plus you can already see your partial result, which provides some motivation.
Cross off the pages in your pattern text which you have already marked (and folded). It’s easy to forget to check for the correct page number and to mark and fold the same part of the pattern more than once…
Mark with a thin pencil, using a long ruler. Put the marks some 2-3 mm away from the border of the page - this way, your marks cannot be seen in your finished project.
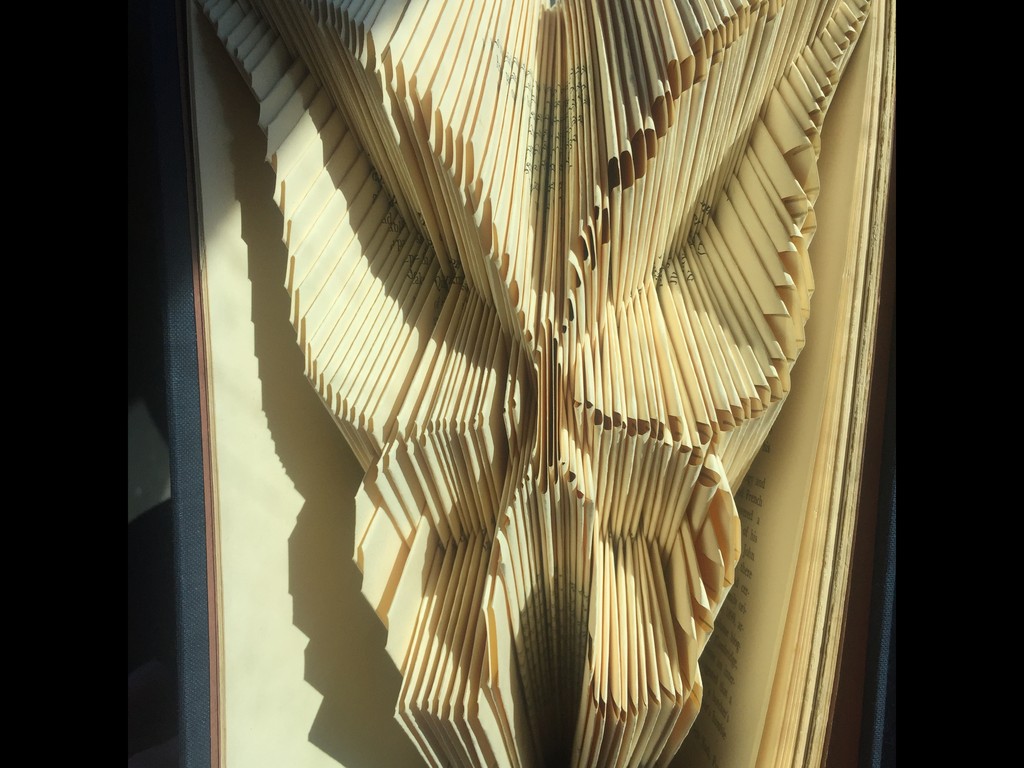
You can use a ‘Geodreieck’ or a hard, triangular shape (45°-90°-45°, maybe from cardboard or plastic) to make your folds as precise as possible. Hover over the pictures for more information.
")
")
")
")
")
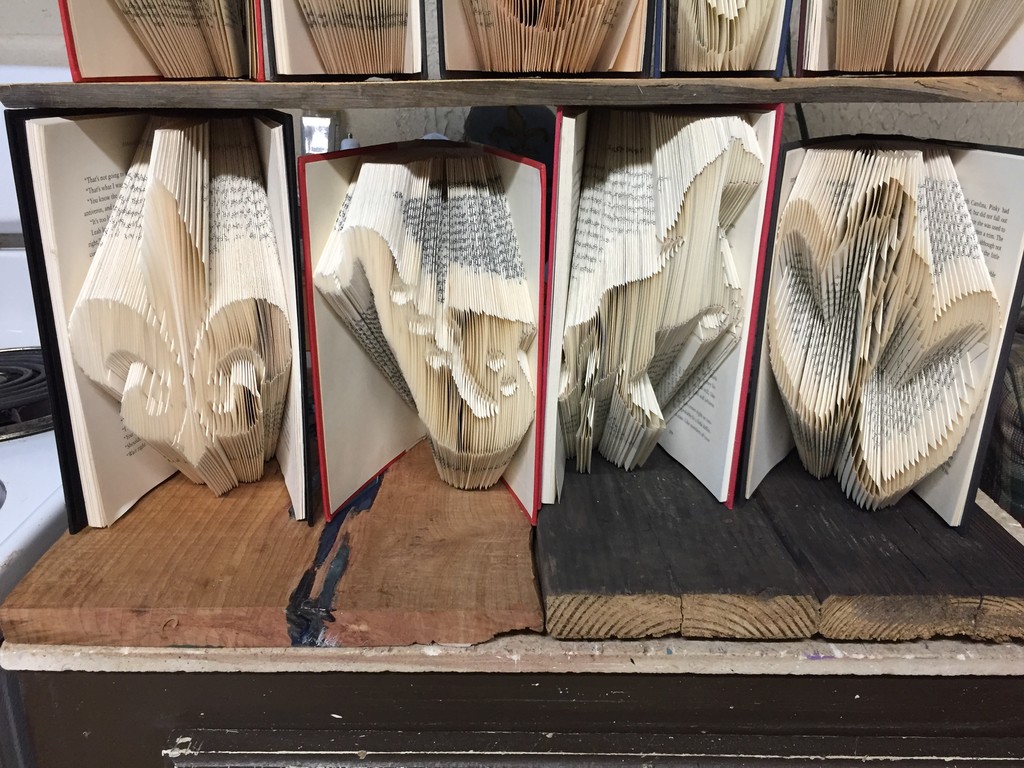
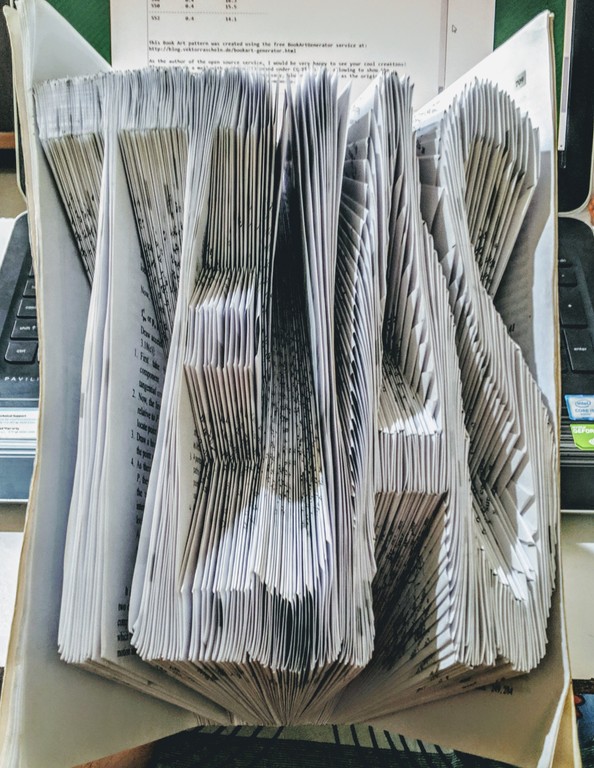
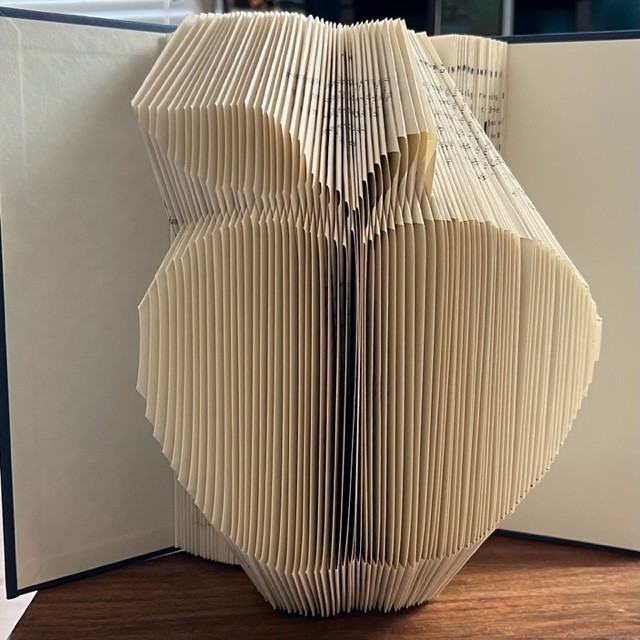
Admire your result
")
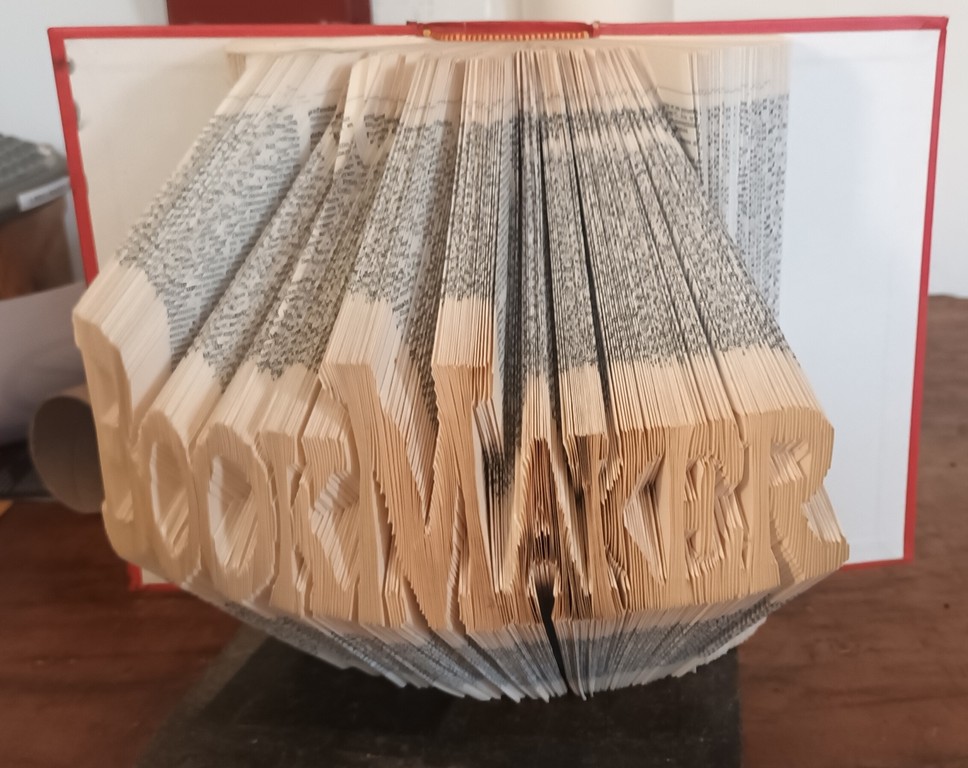
When you’re all through the pattern, put up your new artwork. Adjust the opening angle of the book to adjust the aspect ratio. Fan the pages out regularly.
Enjoy your very own, easy-made art work with your own, original pattern!
Use it as a gift, as decoration, whatever you like!
If you made a nice piece of art, tell others about it in the comment section!
And if you attach a photo to your comment mail (licenced CC-By-SA 4.0 or higher), then I’d be happy to include it into the article’s gallery, as an inspiration for others.
How come this service exists?
Looking into one of the instructables (How-to-Fold-a-Book-into-a-Word-The-original-tuto ), which describes the process of making your own pattern, I saw that the measuring and mapping from picture to page is a really tedious, time-consuming process, which can also go wrong in many places. And I realized that the number of free ready-to-fold patterns is a bit, …. mmmh, limited - you don’t always want hearts…unless it’s Valentine’s day, of course.
As I was also learning how to program, and am a fan of (and humble contributor to) open source software, I thought I could try out my new skills and create something useful at the same time.
So I was learning PHP when I first came across this - and I wrote a program which can turn your picture into a pattern for making book folding art in PHP. Then, some time later, I started learning Python - and rewrote the program in Python, and improved it a little. And then, I thought it could be good to know some JavaScript - and guess what? I rewrote the program in JavaScript and added more functionality ;)
Before the JavaScript version, the program required the installation of some other programs that it depended upon, which many people found difficult to accomplish. It was made available at instructables.com (you can browse the comment section there to see photos of other people’s artworks for inspiration).
Now it’s available as a simple website - you choose your image, enter a few values, click some buttons - and get your pattern. No more Python installation, command-line interface, weird error messages - just a web page.
Happy folding!
(and note the program licence if you decide to make derivative software)
This work is licensed under the Creative Commons Attribution-ShareAlike 4.0 License. You may share and adapt the contents, as long as you publish the result under the same license and give appropriate credit.
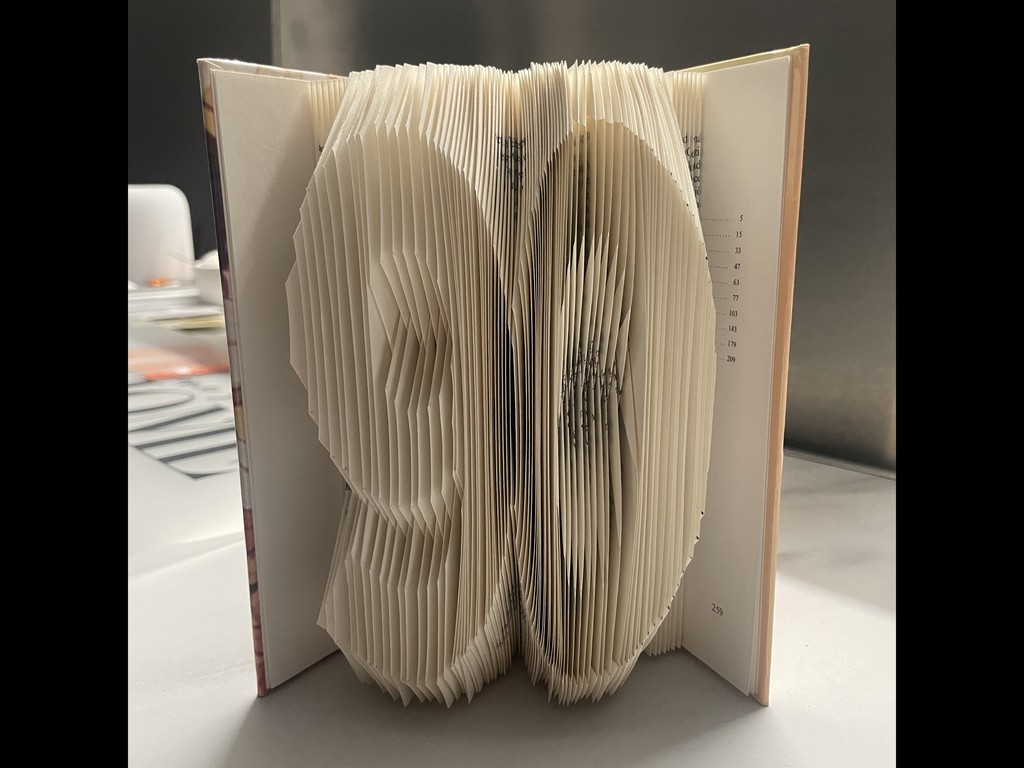
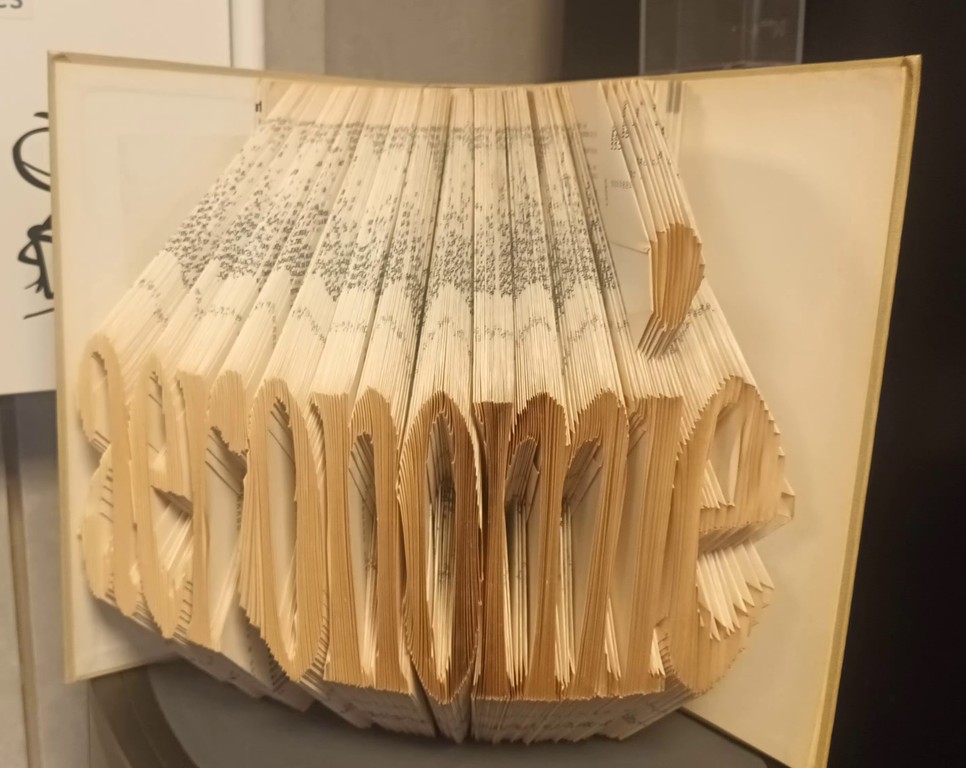
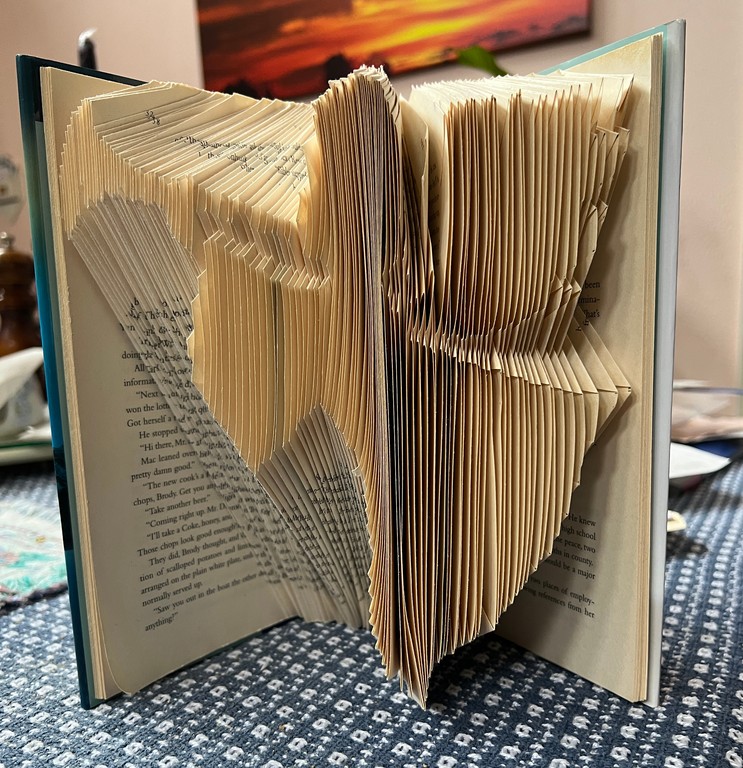
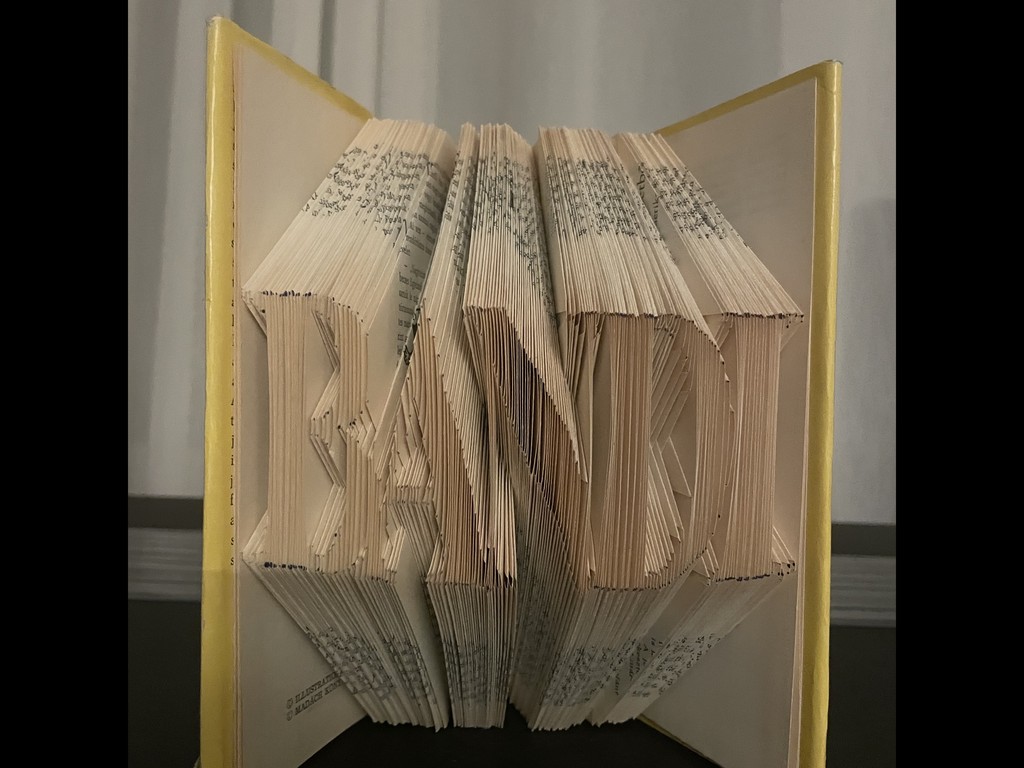
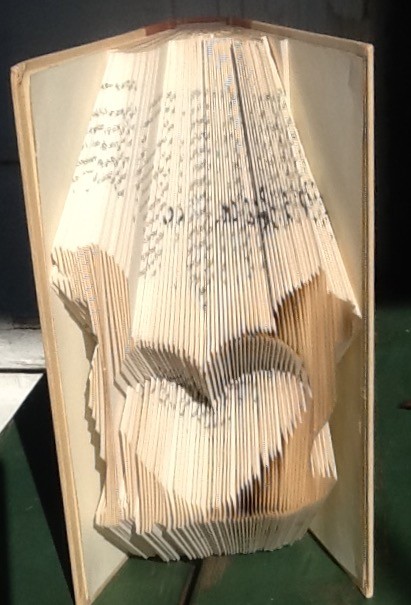
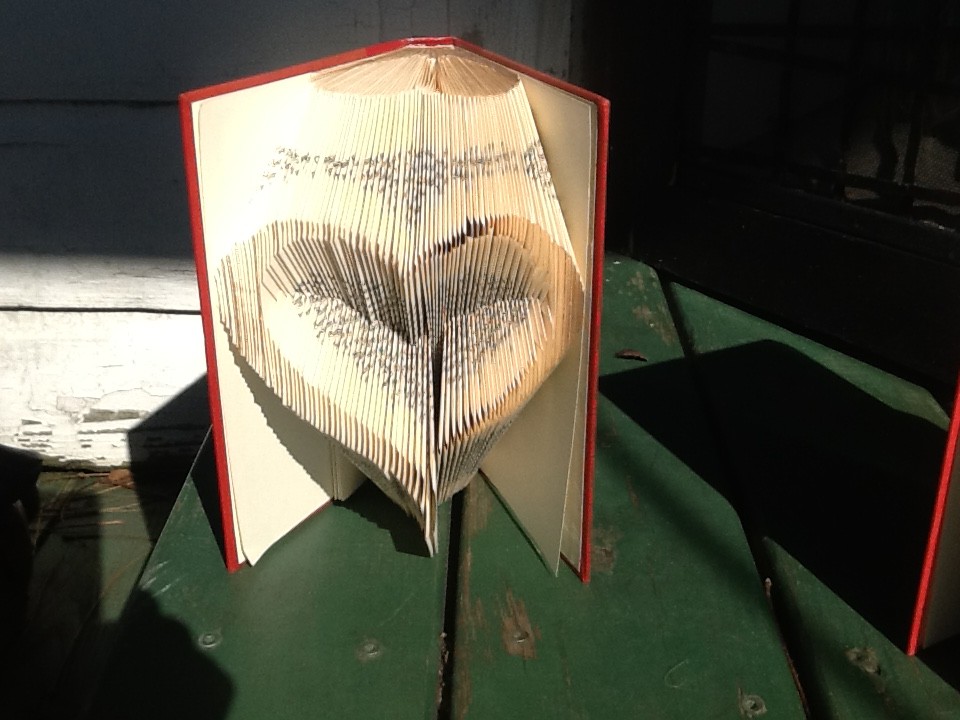
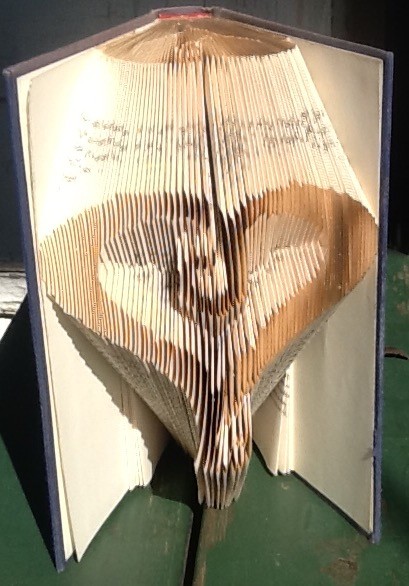
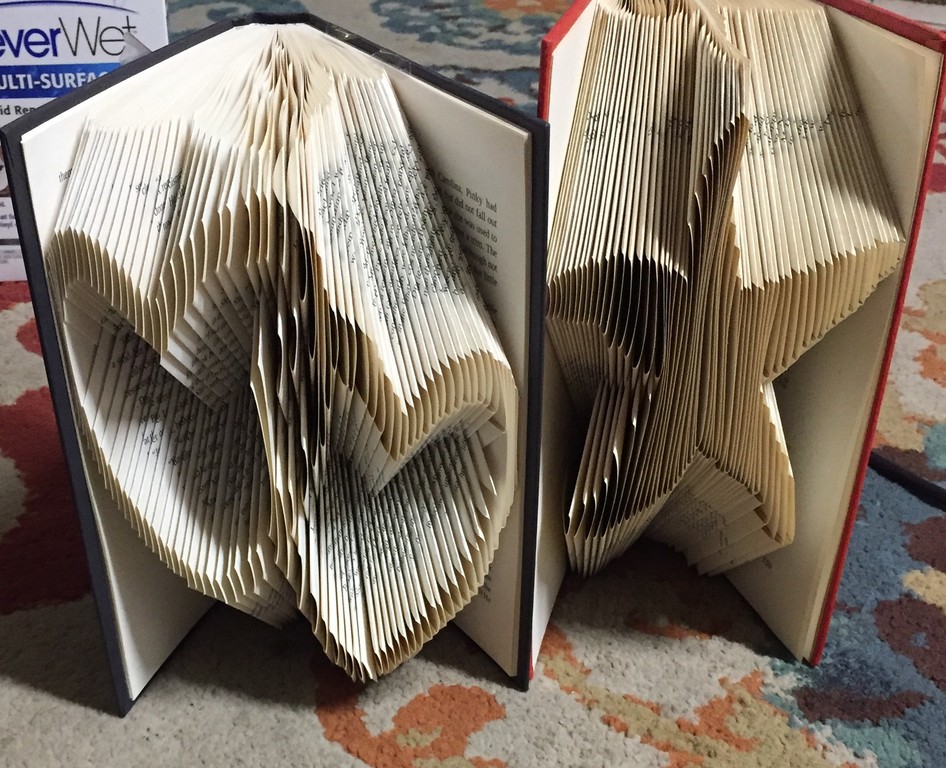
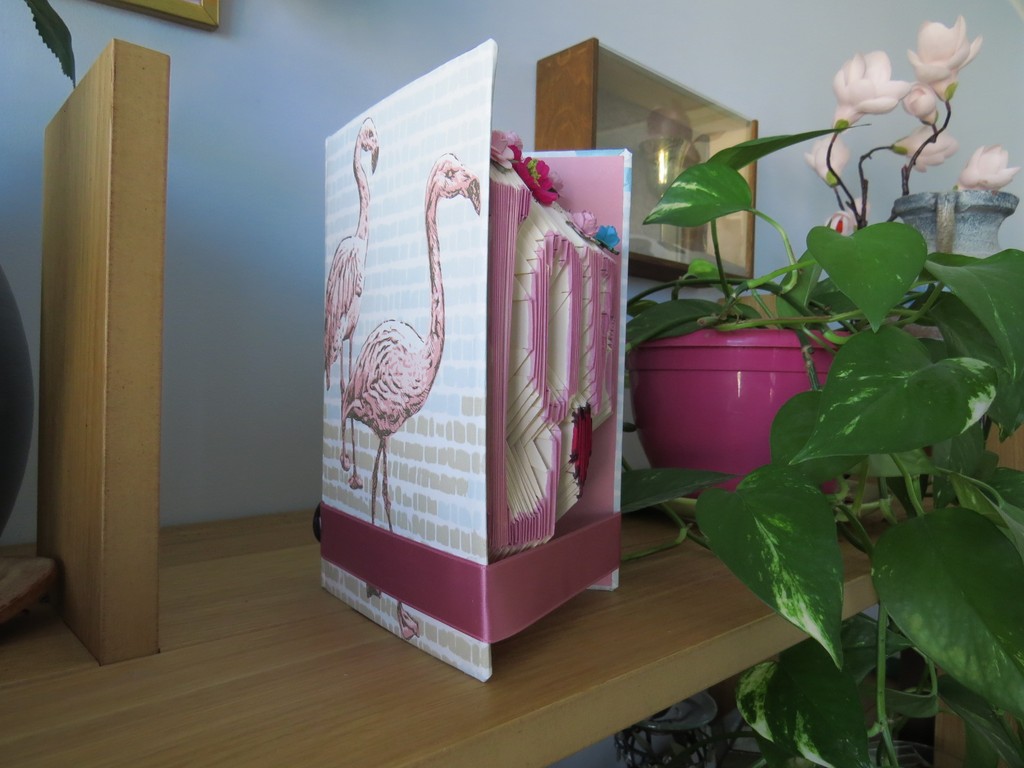
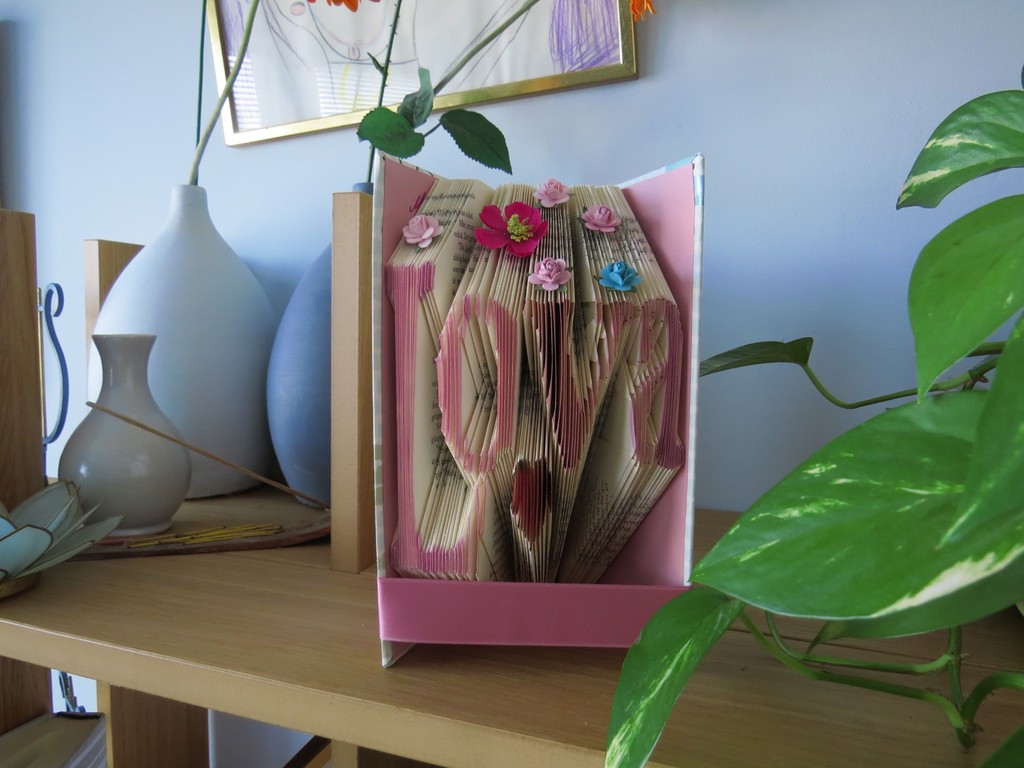
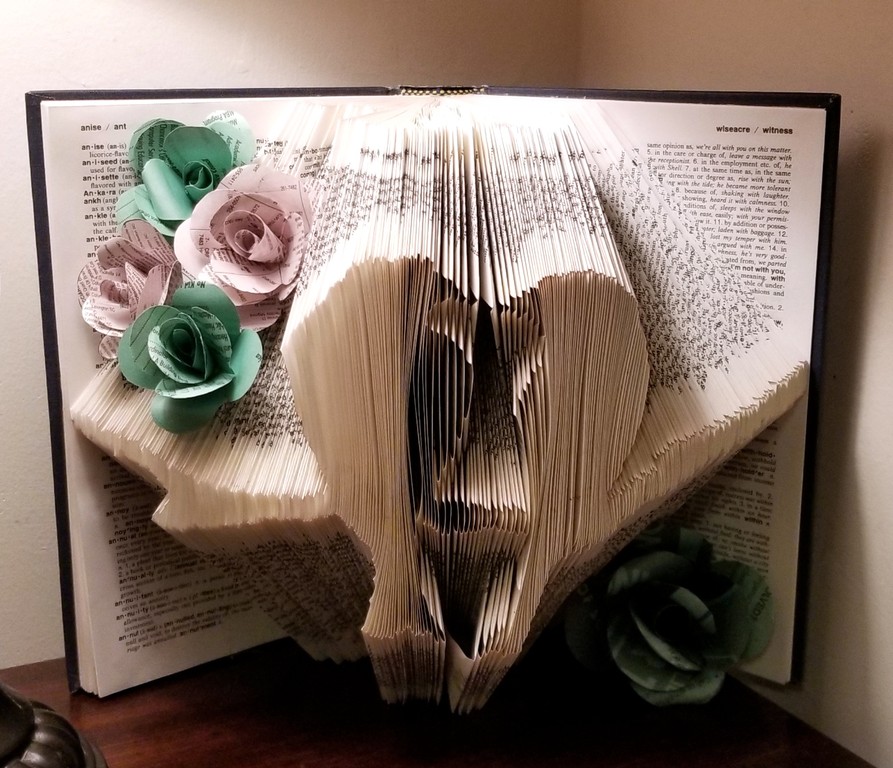
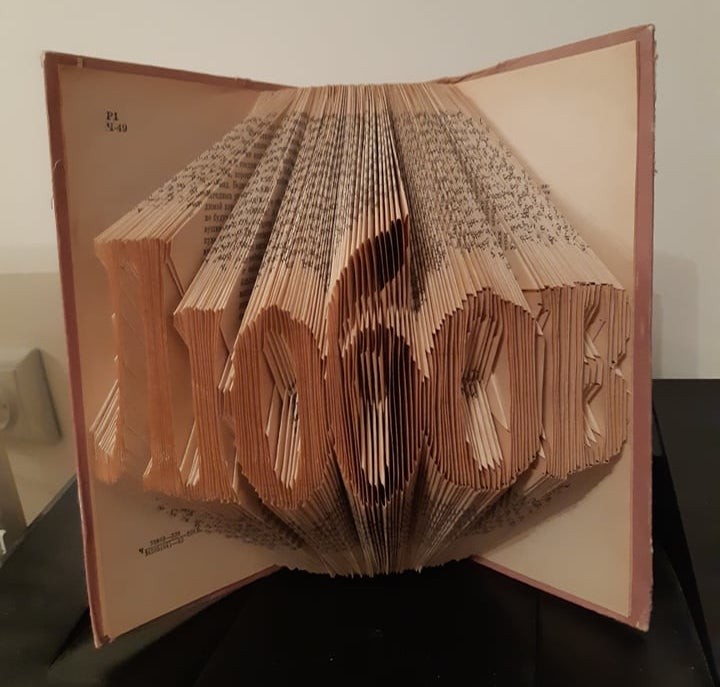
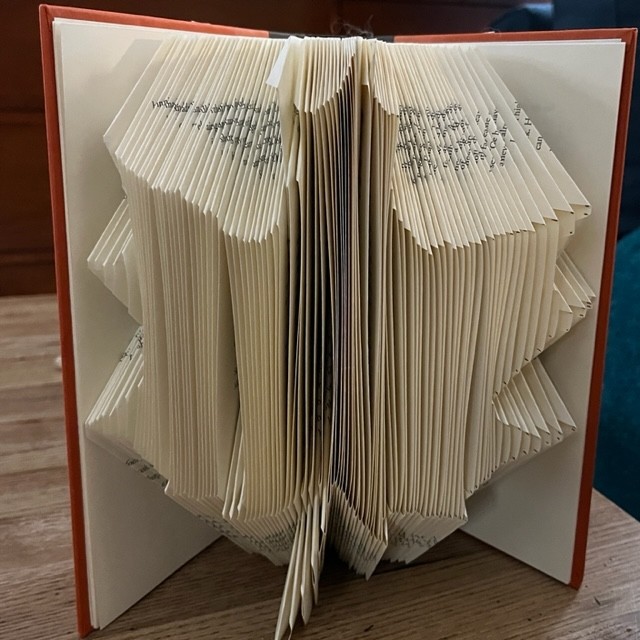
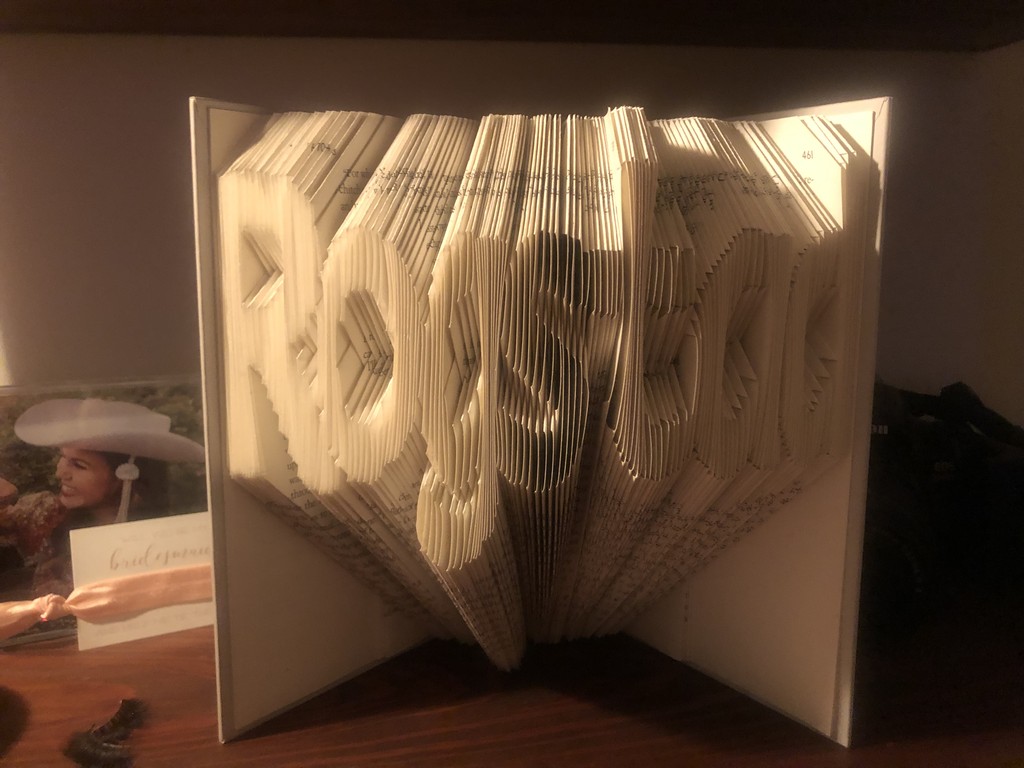
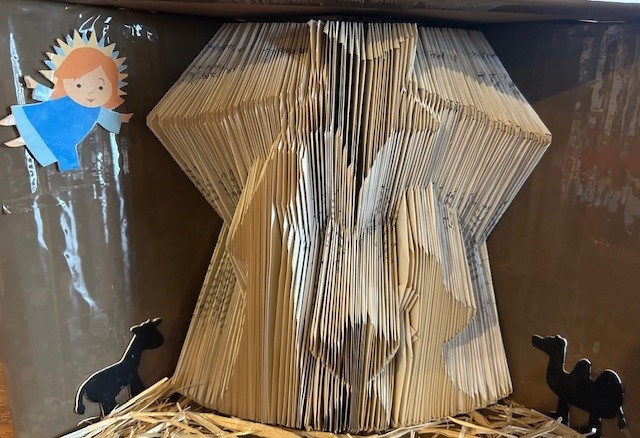
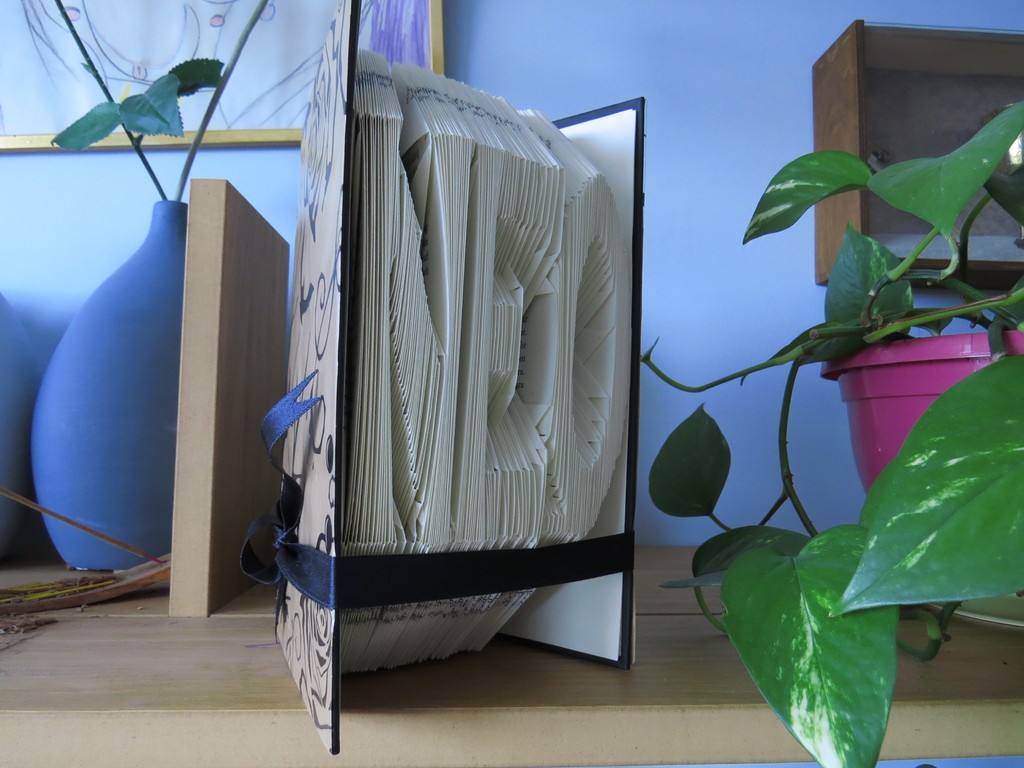
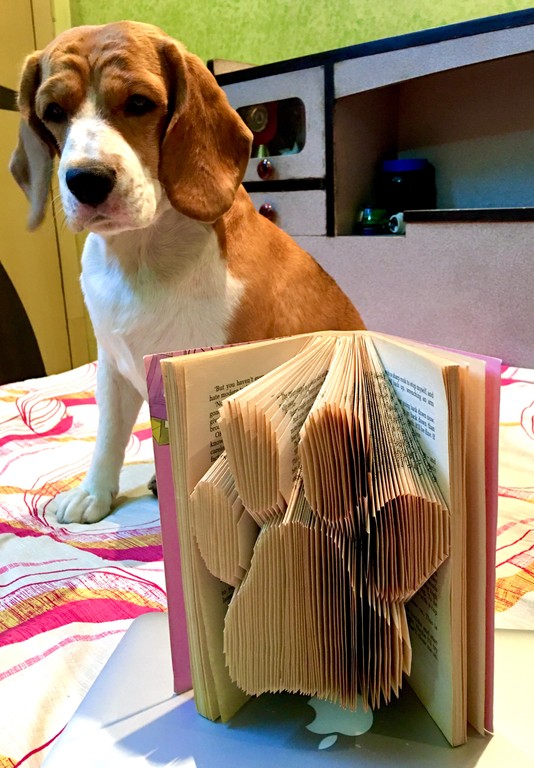
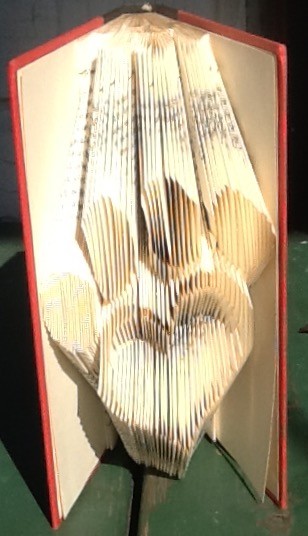
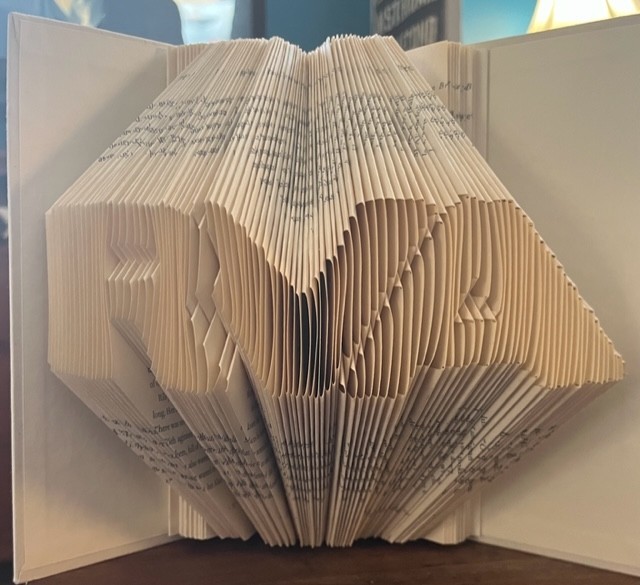
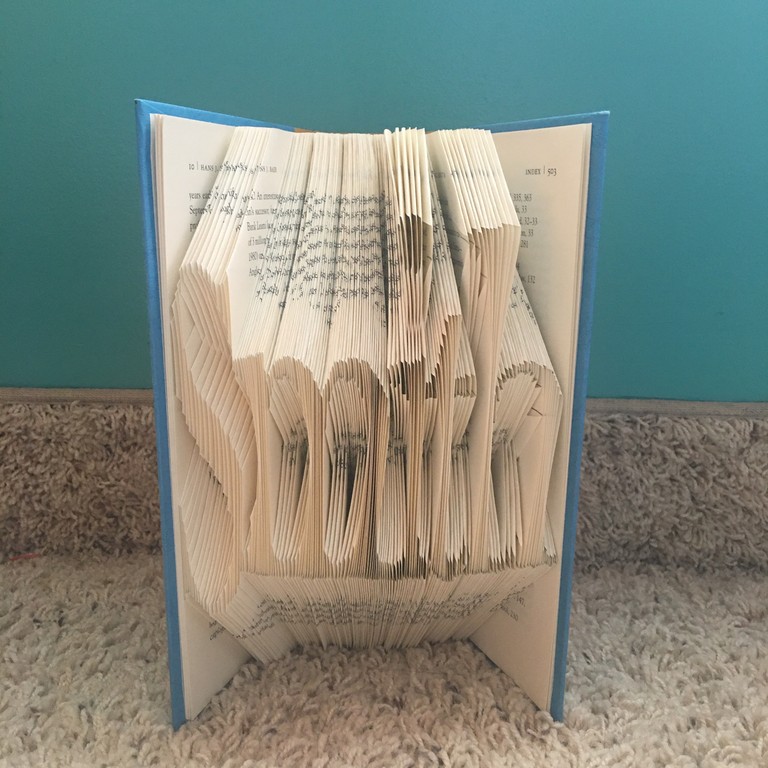
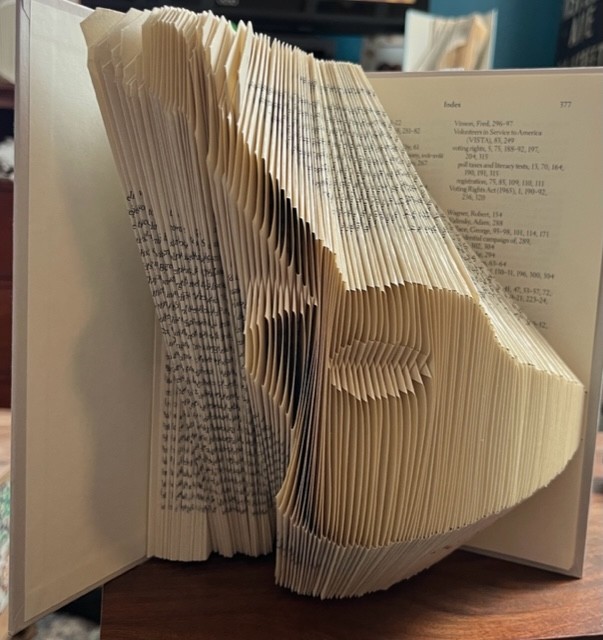
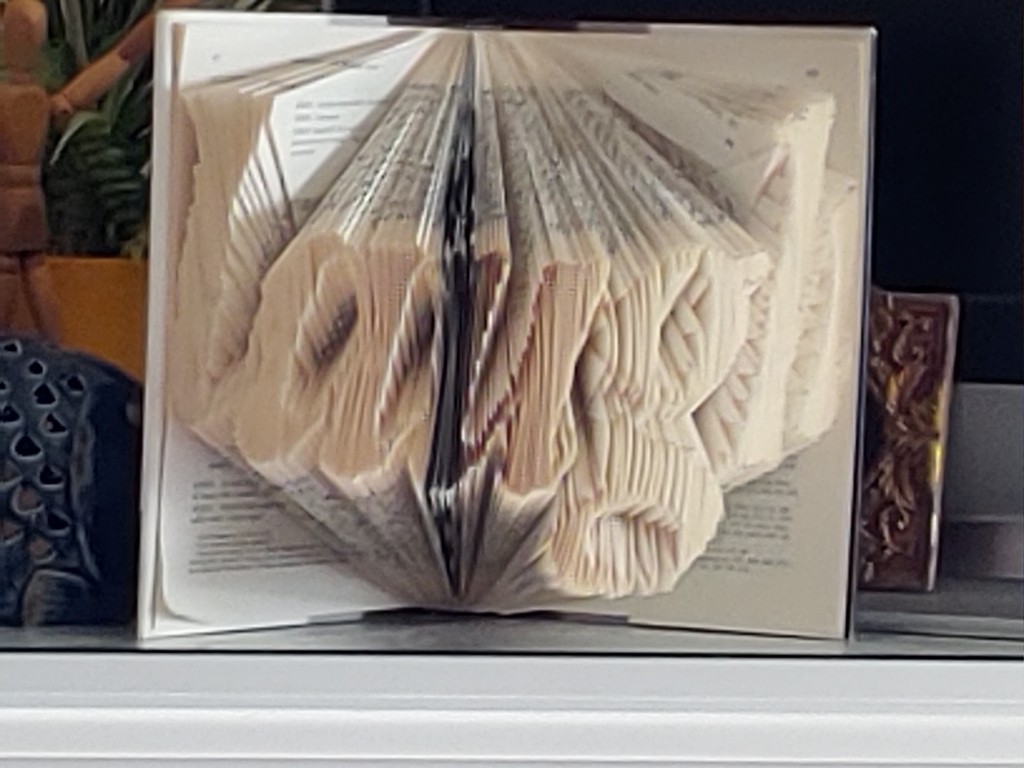
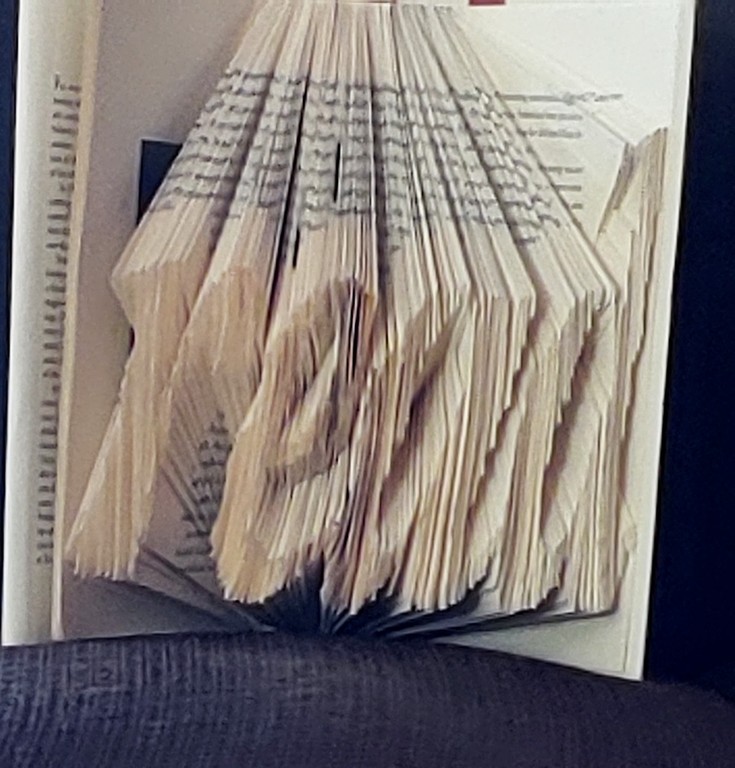
Gallery ⚓


54 Comments ⚓
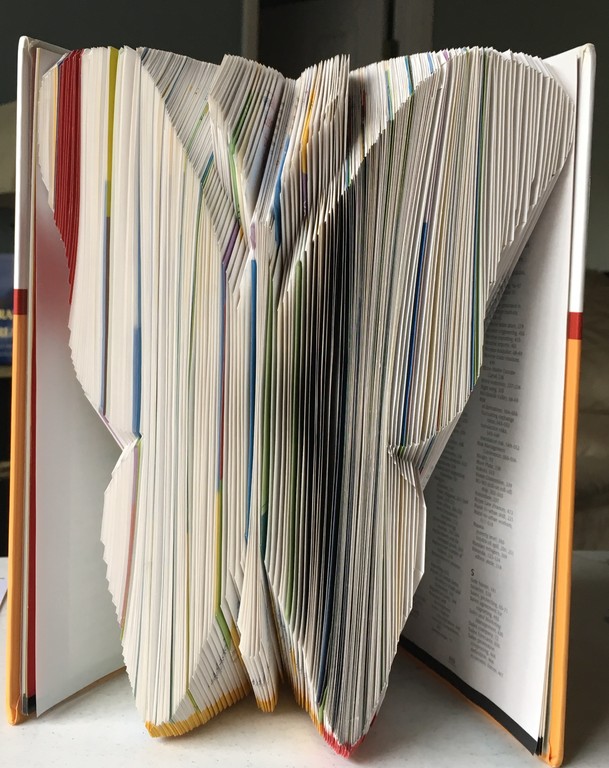
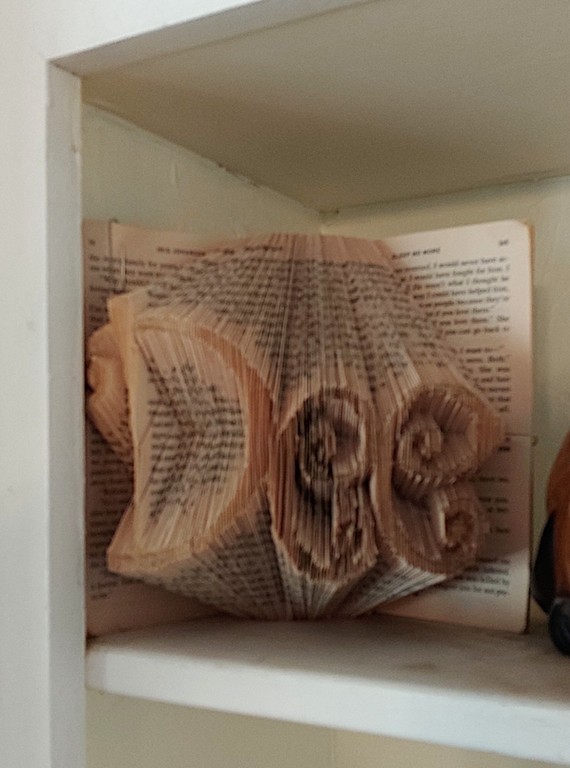
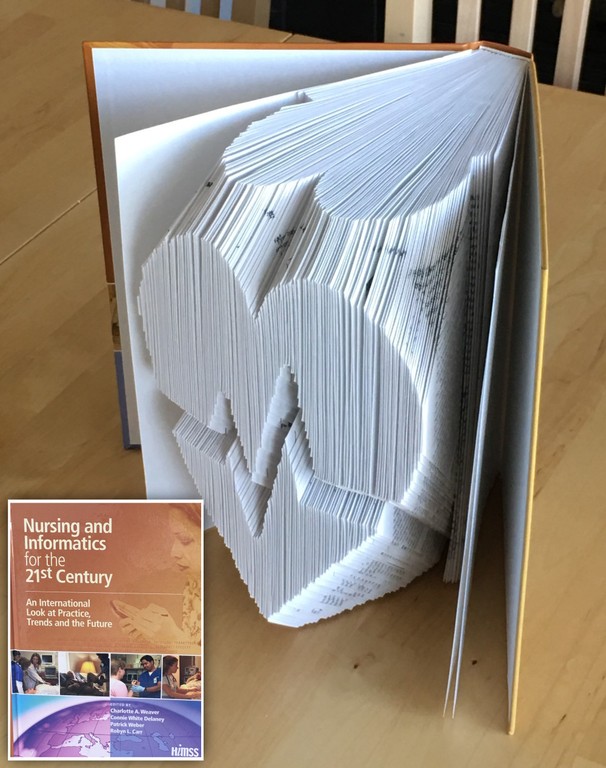
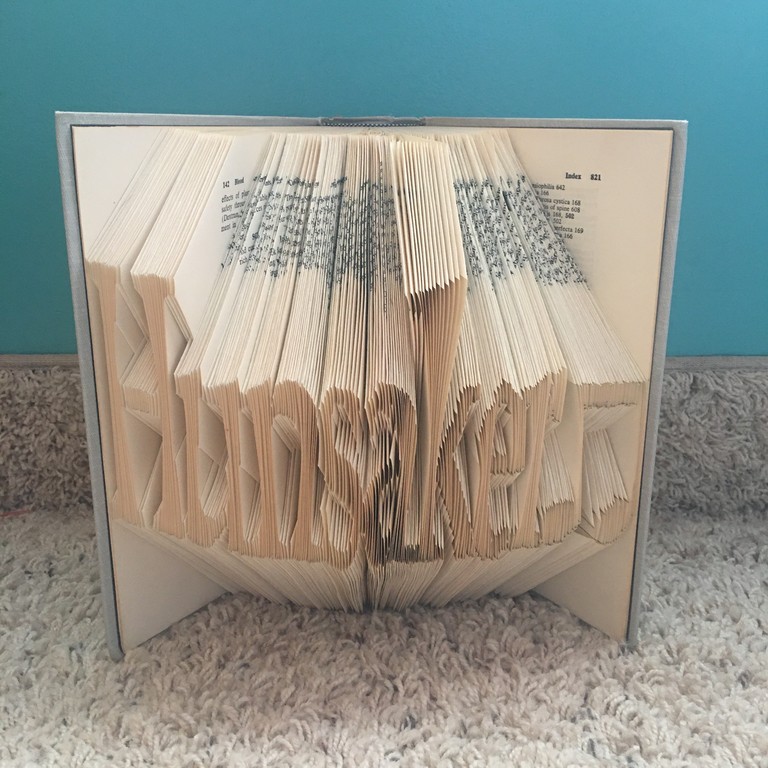
Rhonda ⚓
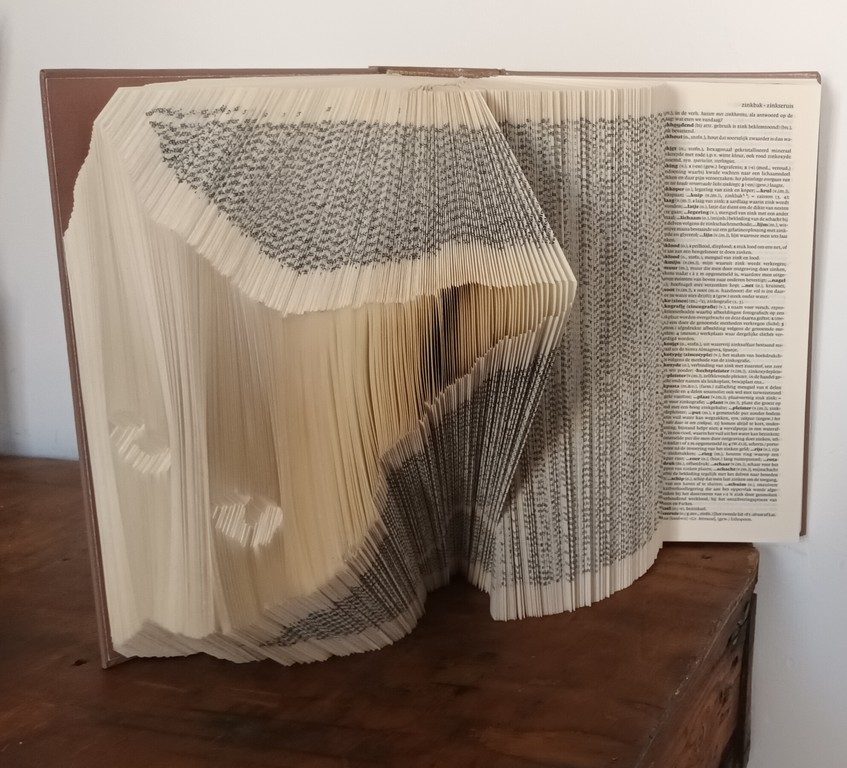
Tue 12 April 2016Thank you for your Bookart Generator. I only had to make a couple of corrections to the folds. Here is the butterfly I did. Thanks again!
Rhonda
Moini ⚓
Wed 13 April 2016Hi Rhonda,
thank you for the photo! Good work! The book looks like an encyclopedia to me - makes for nice colors :)
As discussed by email, I’ve added your image to this page’s gallery, to inspire others who would like to create book art.
Thanks again for sending me a picture - it’s really cool to see what comes out of my little program!
Kathryn ⚓
Mon 09 May 2016Hi! I’ve created two patterns and my first two book folds with your service. Thank you! Question. Both patterns have required very small .5 cm folds top and bottom; i.e., the program stretches the image to the very top and very bottom of the book. Is there a way to build in a buffer so that you don’t have to fold less than 1 cm top and/or 1 cm bottom? If not, what’s the best way to make a precise .5 cm fold?! Thank you.
Moini ⚓
Tue 10 May 2016Hi Kathryn,
to get this effect, you will need to edit the image you want to put on the book, using a bitmap graphics editor. For example, you could use Gimp or Photoshop for this.
Basically, what needs to be done is to resize the image, adding a blank strip at the top and bottom. In Gimp, this can be done by changing the ‘canvas size’.
Hope this helps!
Kathryn ⚓
Tue 10 May 2016Perfect! Tried it out and I got it to work. Thank you very much.
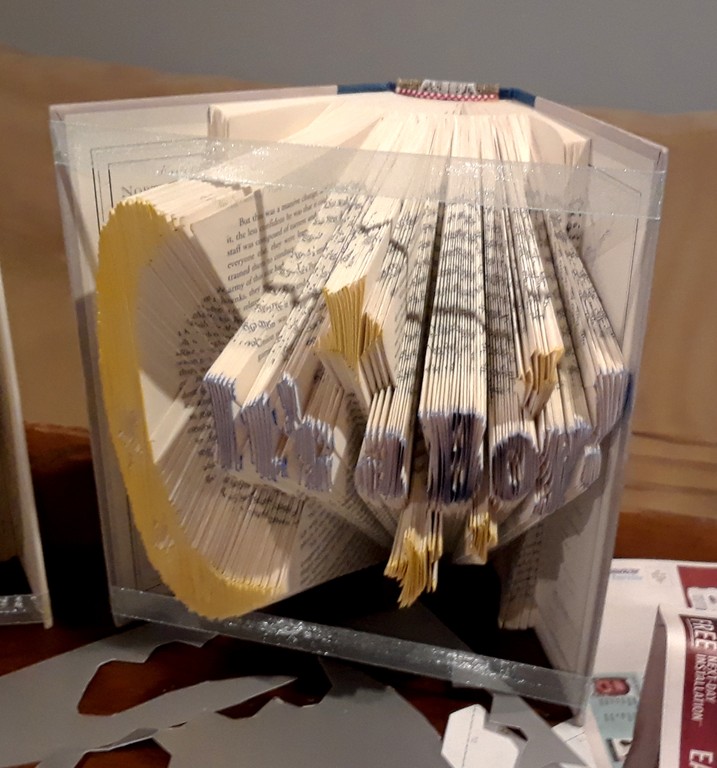
Yvonne ⚓
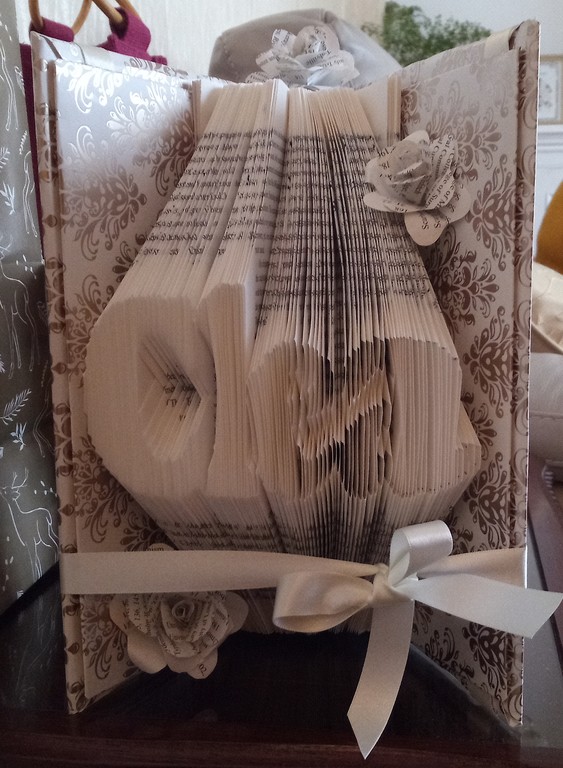
Mon 08 August 2016Thank you very very much for your pattern generator! Love it - I have made two books so far. Both for my grandchilds - Neo is my firs first grandson and Lova is my granddaughter They love them :) Thanks again from Sweden and a lucky family Yvonne Primé
Edit by Moini: Yvonne attached a couple of pictures.
Moini ⚓
Thu 18 August 2016Hi Yvonne,
‘tack så mycket’ for your feedback and the gorgeous photos!
Those books you made are truly works of art - I can understand very well that your grandchildren like them!
I would like to also show them to the people visiting my website.
May I add the photos to the gallery here (above the comment section): https://vektorrascheln.de/posts/2015/Dec/creating-bookart If so, do you want to use a specific licence? For my own images, I always use this one: https://creativecommons.org/licenses/by-sa/4.0/, but I can also just write ‘all rights reserved’, if you prefer that.
And may I add the text below into the comment section? Which name would you like to see on the page? (Some people do not want to see their full name on a website).
Thank you very, very much, too :-) - and best wishes for you and your family from (Northern) Germany!
Kind Regards, Maren
Yvonne ⚓
Fri 19 August 2016Hi, of course you may use my photos and my thank to you. Its ok for me to have my own name, and if your wish You could end it with “Yvonne Primé from Stockholm, Sweden” I dont have any licence, so you just write “all rights reserved” Thanks again, for the moment I work with a book for my daughter in law who will be 40 next week :) With help from your program - a two-liner :) I be back with that one when ready. Have a great day and thanks again //Yvonne
lizl_of_oz ⚓
Thu 29 September 2016Hi, Thank you very much for your software. I created a pattern that looks great. But I have a question. The pattern calls for some pages to be ‘fold back completely’. How do I do that? Thanks again for your great app.
Moini ⚓
Fri 30 September 2016Hi Elizabeth,
for the pages where it says ‘fold back completely’, you can either:
To find out how deep you need to fold that line in, so that it still looks nice, take a look at the neighbouring folds, and how deep they go (from the edge of the page that will be the ‘screen’ for the picture.
Kind Regards, Maren
lizl_of_oz ⚓
Sat 01 October 2016Hi Maren,
Thank you for your reply and a wonderful app.
I ended up folding the page in half. It looks good.
Best,Liz
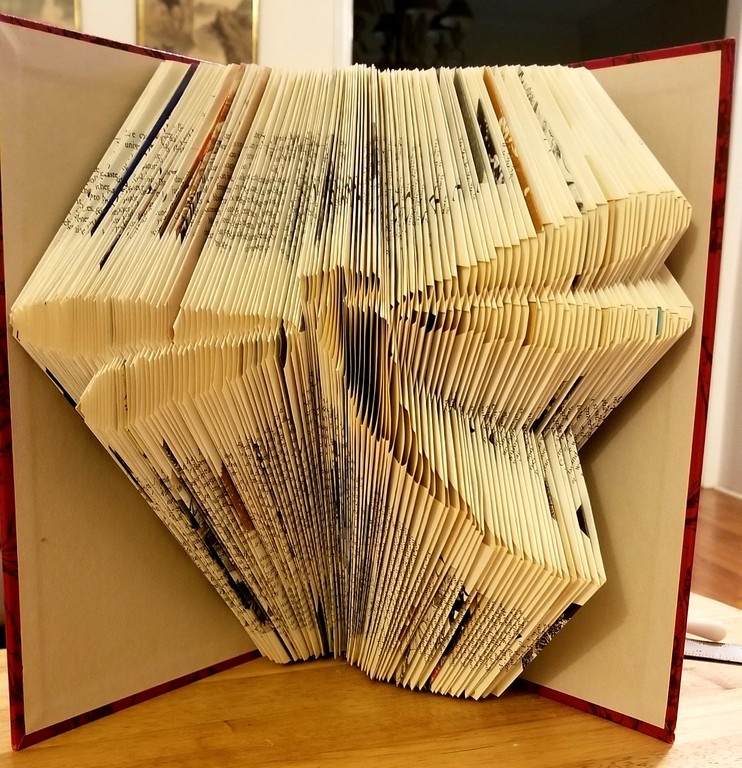
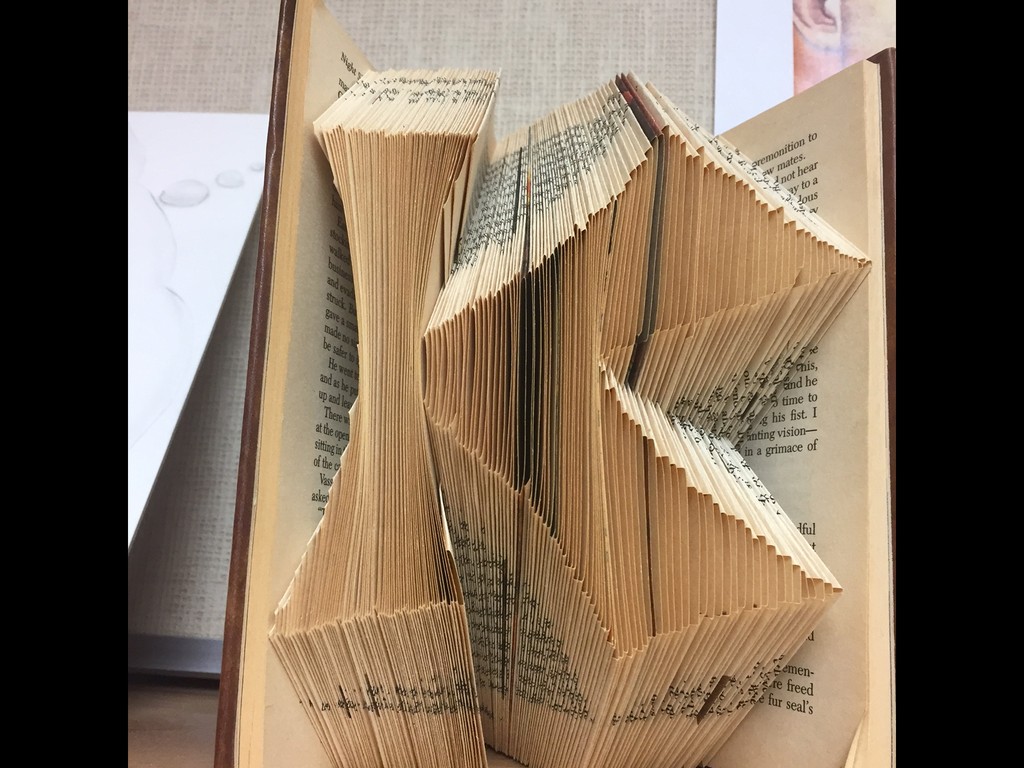
Julie ⚓
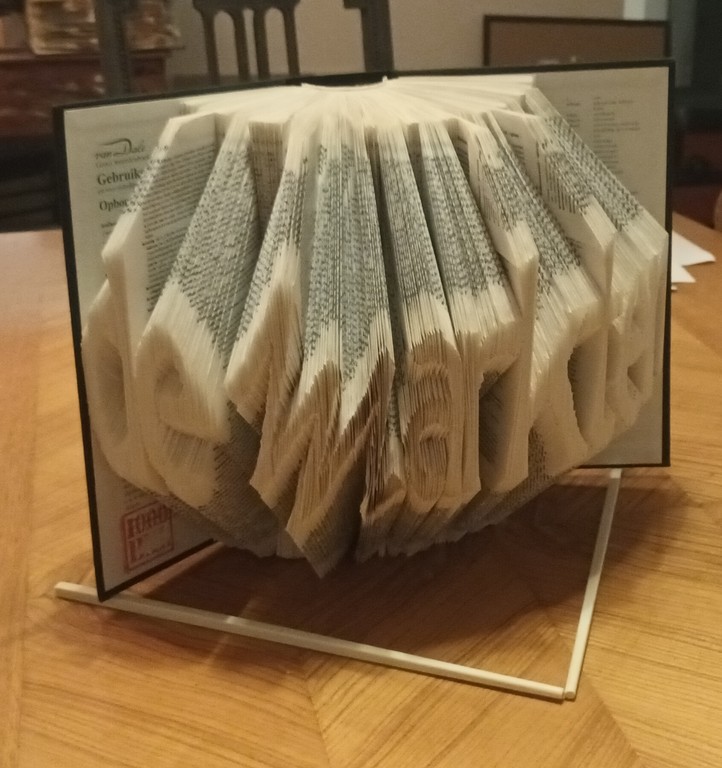
Fri 21 October 2016Thank you so much for sharing your book art generator! I plan on using it to make the patterns for my family/friends’ Christmas gifts. You aren’t planning on removing this website any time soon, are you? I’ve completed three books using your generator so far, but have many more to do! Thanks again! P.S. I don’t bother to do the ‘measure and mark’ style of folding, I just print out your pattern, stick it in the book, and use it as a template for the folds!
Moini ⚓
Fri 21 October 2016Hi Julie,
thank you for your nice feedback and the photo.
It’s really cool to see what people do with the little program. That’s already a nice collection you have there, I especially like the crossing spoon and fork.
Would you be fine with your picture being added to the gallery below the article here: https://vektorrascheln.de/posts/2015/Dec/creating-bookart#creating-bookart-gallery
For the image license, I’d like to ask you if you could choose CC-By-SA (see https://creativecommons.org/licenses/by-sa/4.0/), which is the same license that I use for the blog.
Another user has asked me to put page numbers on the ‘preview picture’. Do you think that would be helpful for the way how you do the folding, too? Or is there something else that would be helpful?
Kind Regards, Maren
Edit: Julie sent another picture and agreed to CC-By-SA licence for the new one, find her image in the gallery! She also said she wouldn’t need any numbering on the preview image.
Robin ⚓
Tue 04 April 2017Thanks so much for sharing what you do! I had been searching for a good bookfolding app and you did it! I do have a question which I saw you answered earlier but sorry, I didn’t understand the answer - when your instructions say “fold back completely” does that mean I fold the top corner and bottoms corner so they meet in the middle? What do you mean by fold so there is a vertical line???
Thanks
Moini ⚓
Tue 04 April 2017Hi Robin,
thanks for your kind words :-)
By ‘fold back completely’ I mean folding the page in half vertically, so the outer page border touches the book’s middle fold. That way, the folded page will recede by a very specific, repeatable amount.
Hope that helps, Kind Regards, Maren
Robin ⚓
Tue 04 April 2017Hi and thanks for responding. Sorry if my questions seem dumb but am new at this and LOVE your program. In the measurements (using centimeters) and it says 7.17 or 8.35 - makes no sense to me. I know where 7.1 cm is but what is 7.17? Thanks
Moini ⚓
Mon 03 April 2017Hi Robin,
if you don’t like the precision set to two decimals (after the . ), then you can change that in the settings (check the ‘single precision’ checkbox).
The dual precision is mostly useful if you use inches, because there it makes a relevant difference, if you have 0.11 inch or 0.15 inch, for example, as 1 inch is significantly longer than 1 cm.
That said, 7.17 is almost, but not yet, 7.2 ;-)
Kind Regards, Maren
Robin ⚓
Tue 04 April 2017Thanks!!! You’re the best
Oona Säteri ⚓
Mon 08 May 2017Hi!
I really want to make one and I know how, but no matter what photo I try to download to that page, it keeps saying that “the file API is not supported on this page yet”.
What should I do?
Thanks
Moini ⚓
Mon 08 May 2017Hi Oona,
it seems that your web browser doesn’t support the kind of javascript that is used on my website.
The easiest way around that would be to upgrade your browser (if possible), or to use a different one. Browsers that are known to work include Firefox and Google Chrome. You could also use a different computer to access the website.
(I guess you’re using Safari on an old Iphone, could that be the case?)
Kind Regards, Maren
Judy ⚓
Sat 27 May 2017I LOVE YOUR PROGRAM!!!!!! Thank you! I would like to send you a gift if you would take it. You can pm me your mailing address. I would like to ask I am running windows 10 and I can’t get the png to download using the button - is there any other way to do it? For the instructions I could select all and paste into a work doc. Thank you for sharing your talents!
Moini ⚓
Sat 27 May 2017Hi Judy,
thanks :D
So the image is created, but the download button does nothing in Microsoft’s Edge browser? Or in IE? I’ve got no way to debug with a Microsoft product (only Firefox and Chrome).
Have you tried right-clicking on the image, and selecting ‘save image as…’ - if that option is available?
Else you could switch browsers. The open source browsers have many advantages - mainly, that they work better with websites…
Hope this helps,
Kind Regards,
Maren
P.S.: You can find my address (which is in Germany) in the ‘Impressum’ (see footer of my website) But I think postage might be quite expensive (assuming you’re in the US, as your mail address suggests), so I won’t be disappointed if you decide to donate to some local institution, or to the Inkscape project instead.
Judy ⚓
Mon 29 May 2017Thank you for your response. I tried it in Firefox and it works perfectly. What a great program you created and shared with everyone.
I will donate in your name to the Relay for Life!
Moini ⚓
Tue 30 May 2017Hi Judy,
I’m glad you found a way to use it on your computer :-)
The charity seems to be a very good choice, thank you!
Kind Regards,
Maren
Phil ⚓
Tue 29 August 2017Hi Moini,
I’m just starting out with Book folding and have migrated to your very useful site, great stuff with the Template Generator makes patterns so much easier, I’m in need of advice from you if possible, I’ve followed the instruction given and have downloaded and saved the Template and folding Instructions however I’m unclear as to how to do the folds - Page 2 is Top Fold 0.00 and Bottom Fold is 0.03, Page 4 is Top Fold 22.56 and Bottom Fold is 22.60, (it’s for a Name-MARK)what do I do for the T-0.00 and B-0.03 as it’s the my very 1st attempt I’d like to understand it better so that I get it right from the start.
Kindest regards.
Phil
Moini ⚓
Tue 29 August 2017Hi Phil,
in the case of the letter stretching from the very bottom of the page right up to the top border, don’t fold at all.
The program detects if the letters go right to the border of the image, and if there is not a single white pixel between the image border and the upper / lower border of the letter, it tells you that there are no folds to be done. However, if there is a tiny margin above/below the letters, then it tells you to make a fold.
To get correct instructions, make sure that your letters either start at a foldable distance from the image’s bottom/top border, or that they touch the bottom/top margin. If a fold is too short to be folded, omit it.
Kind Regards, Maren
Casey ⚓
Wed 11 October 2017Hi. I have been following a pattern for a paw print but I got to a point where the top fold is 21.4 and the bottom is 22.7. This would just fold the paper inside of itself and you wouldn’t see anything. Is this correct?
Moini ⚓
Wed 11 October 2017Hi Casey,
all measurements start from the top. So there will be a 1.1cm of the page border left after folding.
See also: https://vektorrascheln.de/posts/2015/Dec/creating-bookart#how-to-read-the-pattern
Kind Regards, Maren
Sarah Gafter ⚓
Thu 25 January 2018Hi, this is great!
Is there any chance you can add colored lines that are numbered every 10
I’m having my wedding at the local library, so I’m planning on doing some table decorations with book folding.
Moini ⚓
Tue 30 January 2018Hi Sarah,
you’re not the first person who asks for it to be easier to determine the page number from the proofing picture. It wasn’t initially intended for being printed out and used instead of a ruler/pencil, but was only meant to enable users to check if pattern creation worked properly.
Anyway, due to popular request I’ve now added both page numbers and a bit of color, hope that will make folding books even more fun :)
Kind Regards, Maren
Sarah Gafter ⚓
Thu 25 January 2018Thank you! This is a wonderful tool!
JH ⚓
Wed 28 February 2018Hello! I can’t tell you how excited I was to find your Bookart Generator - thank you! I just took a class at a local library, and what fun it is!
A couple of questions (I am admittedly a little embarrassed to ask, but they may help others too =))
1) Book Height, should it be the entire book - or just the height of the pages? 2) If I choose centimeters, should the book height also be in centimeters? 3) I read your instructions, but I guess I am still a little unclear - should the image that I upload, be the size of the book unfolded, closed, or is there another way to think of it?
Thank you again, I CANNOT WAIT to make more Bookart!
JH
Moini ⚓
Tue 30 January 2018Hi Jordin,
You’re welcome!
A class in the library? Cool! (esp. when you think about the fact that it’s basically destroying books :-o) What did they teach? (and in which country did you take the class?)
1) You’re right, that’s the page height. I’ll replace the term, that’ll make it clearer.
2) Yes, use the same unit for everything.
3) There’s no such thing as size for the image (and it’s also not being uploaded, it all happens on your own computer, I cannot see what kind of projects people do).
The picture should have at least as many pixels as there are sheets in the book, just so it’s going to look okay. But it’s not strictly required.
What’s important is the width/height ratio. To test for an optimal ratio, put the (not yet folded) book up before you, open the covers a bit and fan out the pages.
Open the book as far as you want it to be opened.
Make sure the page density looks good enough to show the picture clearly once it would be folded into the pages. If the pages are too far away from each other, it’s not going to look good, also if they are crammed together too much.
Then take the ratio between the distance between the covers (width) and the page height (height) as an indicator for the width-height ratio of the picture. It’s not a science, though, you don’t need a calculator, just roughly estimate using your eyes.
Hope that helps! Happy folding!
Maren
Anne ⚓
Fri 06 April 2018Hi - I am going to fold a book that has 14 pages in the front that are an introduction (and marked with roman numerals). Do you have any recommendation for how to input this into the ‘first even page?’
Moini ⚓
Sat 07 April 2018Hi Anne,
would it help you if the Bookart Generator website allowed for negative numbers for pages? I cannot add Roman numerals, but negative would probably be possible.
Until any change has been made, you could just count the additional pages, and then later, when following the pattern, you’d have to substract the number from the numbers that are printed out.
Kind Regards, Maren
Anne ⚓
Mon 09 April 2018I think that negative numbers might help.
I was also unsure about what single precision meant, or what smoothing does. Perhaps you could supply some details? I was able to figure out precision, but smoothing would be helpful - perhaps with an example.
Yours is the only website that I found that does this - thank you so much for this program!
Anne
Moini ⚓
Wed 11 April 2018Hi Anne,
you could try it out now with the negative numbers. Make sure to also count one page as page number ‘0’.
Let me know if that works for you!
Do you see the tooltips for smoothing and precision? Or are their texts too cryptic?
Kind Regards, Maren
Perrine ⚓
Sun 14 July 2019I was looking for a specific pattern but couldn’t find it and then I found your page. Thank you! Still a work in progress but I’ll send a pic when I’m done.
Moini ⚓
Wed 11 April 2018Hi Perrine,
I’m glad you find my website useful. Have fun making something beautiful!
Maren
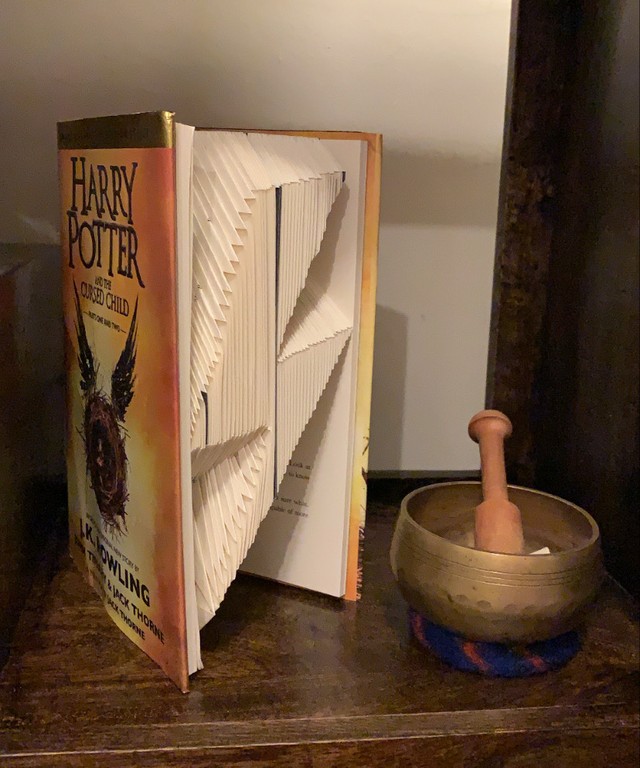
Tejas ⚓
Sat 27 July 2019Hello Maren,
Thankyou for this amazing tool you have created. I always wanted to make my own book folding art of my name. It took me a week to sort out initial things and understand the margin spacings and how to mark things. Yes, the pattern and image output is very easy to understand and use but I had made a mistake of not leaving margins on top and bottom which led to full page markings and it wasn’t looking satisfactory at the end. So, I unfolded back everything, manually added margin value to top and bottom markings and then it was looking good after all folding. But the I found out that there were 2 types of folding 1) 90° fold to the marked point 2) Manually marking a baseline from the backbone of the book so that it acts as a point of reference to fold from the marker.
A lot of people found the 2nd one to look better coz there was uniform folding lines and a base for the book to stand firmly when completed. So, I unfolded again and used 2nd method and just finished it. It was really tiresome but damn exciting too.
You have asked a photo of my completed creation at the end of the pattern file. I’ve attached it to my email. Thankyou for providing this amazing tool for using. Really loved it.
I just learnt that the thickness of the page matters too. The book I’ve using has thin pages. Hence, the letters seem to be tightly stacked up. My sister’s day is coming up next month. I’m now gonna work on her name.
Thankyou again 😁 - Tejas
Moini ⚓
Wed 11 April 2018Hi Tejas,
Thanks for the feedback and the picture, I always enjoy reading and seeing what people create!
I think your feedback might be helpful for others, too.
And I think your sister will enjoy the present you want to give to her - all the work that goes into such a book!
Kind Regards Maren
Kris ⚓
Tue 10 December 2019Thanks for your webpage!
Zee ⚓
Sun 08 March 2020Hi! Is this just for folding patterns only or can it he used for cut and fold ones too? I’m looking to make some more intricate patterns where you have to cut as well as fold but struggling to find some guidance online with it. Thank you!
Moini ⚓
Wed 11 April 2018Hi Zee,
currently, the program only works for creating folding patterns. A while ago, someone had contacted me, because he wanted to help and add cut-and-fold functionality to the program, but it seems he didn’t have time for it yet.
VIVIAN LEE ⚓
Wed 16 September 2020Question… for “completely fold back” does that mean fold in half?
Moini ⚓
Tue 22 September 2020Hi Vivian, see my reply to lizl_of_oz above.
Jodi Boyd ⚓
Mon 21 December 2020First, thank you for your website. It is fantastic. Here’s my issue/question: If I’m doing text, like a last name, can the image be centered vertically on the page? I’ve done a couple of last names using this program, and the letters are “stretched” vertically so that the finished product is hard to read straight on. Maybe I’m doing something wrong when entering the data points for the pattern.
Moini ⚓
Tue 29 December 2020Hi Jodi,
of course! If fanning out the pages isn’t enough, all you need to do is to make the image that you use include a bit of margin on both sides. Those margin pages will then have the instruction to ‘fold back completely’.
Hope that helps! Kind Regards and a Happy New Year, Maren
Terry ⚓
Tue 16 August 2022Hi Maren,
I just discovered book art and see lots of patterns out there. However, I, too, am a programmer - so I thought I could figure out a way to make my own patterns. Then I found your site, and you’ve already done it! Nice Job! I’ve just created my first pattern here and will give it a try.
Kudos to you for sharing your talent and making it possible for others to indulge their creative side. Wishing you many blessings!
Terry from Texas
Moini ⚓
Fri 02 September 2022Hi Terry!
Thank you very much for your kind comment, I hope you’ll have lots of fun folding books!
Maren
Paula ⚓
Sat 24 September 2022I cannot begin to thank you enough for making your generator and making it free at that! I absolutely love folding books, have made many for family and friends. Does anyone know a good fancy font that shows up good?? Thank you again!
Moini ⚓
Sat 24 September 2022Hi Paula!
I’d go with a font that is not too thin and where the spaces inside the letters are not very small. A good starting point for finding a nice font could be https://fonts.google.com/?category=Display&sort=popularity&subset=latin¬o.script=Latn&preview.text=LOVE&preview.size=76&preview.text_type=custom .
Good luck!
kaz ⚓
Sun 25 September 2022hiya, i would like to do a name with my book but i cannot figure out how to start. how do i go about getting the writing before i put all the info in plz
Moini ⚓
Sun 25 September 2022Hi kaz,
you could start with this article.
Maren